
What You’ll Need to Become a Blogger
Blogging as a full-time career, or even just a side gig, requires a high level of commitment. Once you decide to do it, the next step is to identify what you need to hit the road running.
So, what do you need to start a blog? The key is to get your blog up and live – not to get it perfect right away.
There will be plenty of time down the road to get the perfect logo, branding colors, WordPress theme and so on. Right now, you want to focus on getting a live platform up so you can start blogging.
My goal for this course is to help you create a fundamental foundation that you can build on later. We’re not taking shortcuts or skipping important steps, but we are prioritizing progress over perfection.
In order to build a solid foundation that we can launch to the public, you’ll need the following:
- Niche: This is the industry or high-level focus of your blog. Your audience will likely be very interested in this niche.
- Domain: This is the URL, or site address, that people will use to find your blog.
- Content Management System/Platform: This is what you’ll use to manage your posts, pages, and files. WordPress is the most popular option in the world for bloggers.
- Theme: This is a quick and efficient way to design and style a WordPress site. No WordPress sites can be complete without a theme.
- Plugins: These are what allow a WordPress site to rapidly add functionality without hiring a custom developer.
- Tools & Subscriptions: These will help you do research, write and optimize content, track your progress, and more.
How Much Does it Cost to Start a Blog?
You might look at all of that and think to yourself that starting a blog is out of range because of how much you need. Actually, quite the contrary. These costs are much lower than you might think relatively speaking.
One of the nice things about starting a blog is that you don’t need much, if any, money to get started. There are pleny of ways to start a blog for free, but certain paid features and tools can help boost your credibility and, in turn, your subscriber count.
Starting a blog can cost as low as $30 up to $1,000 annually, depending on your niche, goals, and marketing strategies. However, if you’re outsourcing some tasks, the cost can go up.
Take a look at the table below for a breakdown of some costs you should expect when starting a blog.
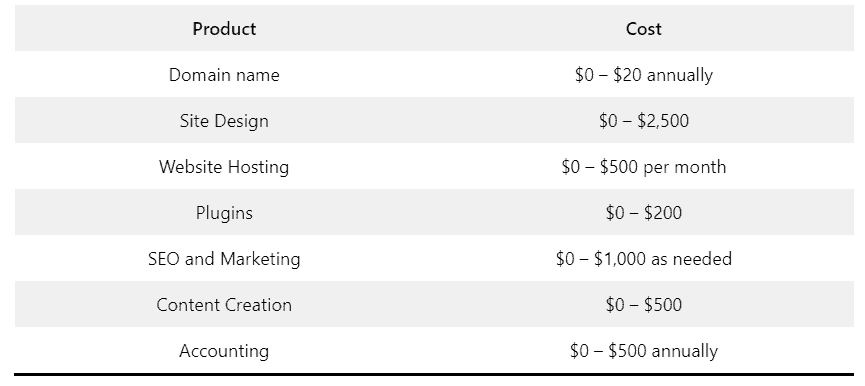
Three other costs to factor in are hardware, software, and subscriptions. These costs vary significantly based on your specifications, niche, needs, and region.
Just be sure to look for free open-source alternatives to popular software programs that are necessary for your blog or area of expertise. They’re often just as good and can help you save a bit of money.
The bottom line, your startup expenses depend on how big you want to start. If you aim to make blogging a full-on business plan and hire people, the cost can go up to thousands.
We’ll keep each of these quick and to the point so you can get started as quick as possible and focus on the things that matter most.
Don’t worry, it’s not as complicated as it sounds. I’ll walk you through the process every step of the way.
My Favorite Tech Stack to Build a Blog With
The backbone of any successful blog is its tech stack—the combination of software tools and platforms that power your website.
But most bloggers don’t realize how much a tech stack can impact a blog’s performance, scalability, and user experience.
Luckily, you’ve chosen to start a blog in a time of cloud-based infrastructure and software companies selling their tools direct-to-consumer. This means that you can get enterprise-level tools at a fraction of the cost.
However, with a massive amount of themes, plugins, and tools at your disposal, where do you start?
It’s hard to get overwhelmed with what to purchase and what to set up. That’s why I created this module so you don’t have to worry.
Below, I’ll show you the tech stack that I use to not only ensures my blogs are optimized for efficiency and user experience, but one that keeps costs low and in reach of even the most budget-friendly bloggers.
I think it’s safe to say that I’ve used pretty much every blogging-related tool, software, and subscription under the sun. I’ve spent a LOT of money on trying to figure out what’s worth the cost and what isn’t.
Granted, things have changed over the years. Ten years ago, the landscape was a lot different than it is now. Digital marketing has come a long ways, which means that software has too.
After years of testing and tweaking, I’ve finally found the perfect tech stack that I can confidently recommend to any new blogger looking to build a reliable foundation at an affordable price.
Core Setup: What Powers My Blogs
- Domain Registrar: Namecheap
- CMS: WordPress.org
- Hosting: WP Engine
- WordPress Theme & Framework: GeneratePress Premium
Additional Functionality & Features I Use
- Analytics: Site Kit by Google
- Anti-Spam: Akismet
- Forms: Gravity Forms
- SEO: Rank Math Pro
- Image Optimization: Imagify
- Caching & Performance: WP Rocket
At the forefront of my mind when putting this tech stack together is reliability, scalability, and performance, while not forgetting about not breaking the bank.
I’ve tried to do this as cheaply as possible, but in some areas (like hosting) going cheap means having to deal with huge headaches that turn into much bigger issues than necessary.
Again, I’ve built this based on what I’ve seen successful, as well as having seen what has frustrated me. You’re saving years of experimenting by taking my recommendations here.
My Blog Tech Setup Explained In Detail
If you’re just looking to build a blog as quickly as possible, just get the recommendations in the links above.
However, I know that some people might be interested in why I chose each recommendation, so I’ll give a brief explanation for each below.
1. Domain Registrar
I use Namecheap for all of my domain registrations. Unlike most other registrars that I’ve used over the years, Namecheap doesn’t seem to nickel-and-dime me at every turn.

The prices are fairly affordable overall, but I like that what you see is what you get. Prices may go up every now and then, but it’s not like you paid $5 to register a domain and then it’s $30 when you renew in 12 months.
I hate GoDaddy for this reason. They market to beginners, but then raise prices substantially with time. It drives me nuts when there are much better alternatives on the market – like Namecheap.
I’ve also had good experience with their support team. They maintain 24/7 support, which is super quick and helpful when you need to talk to somebody.
2. Content Management System
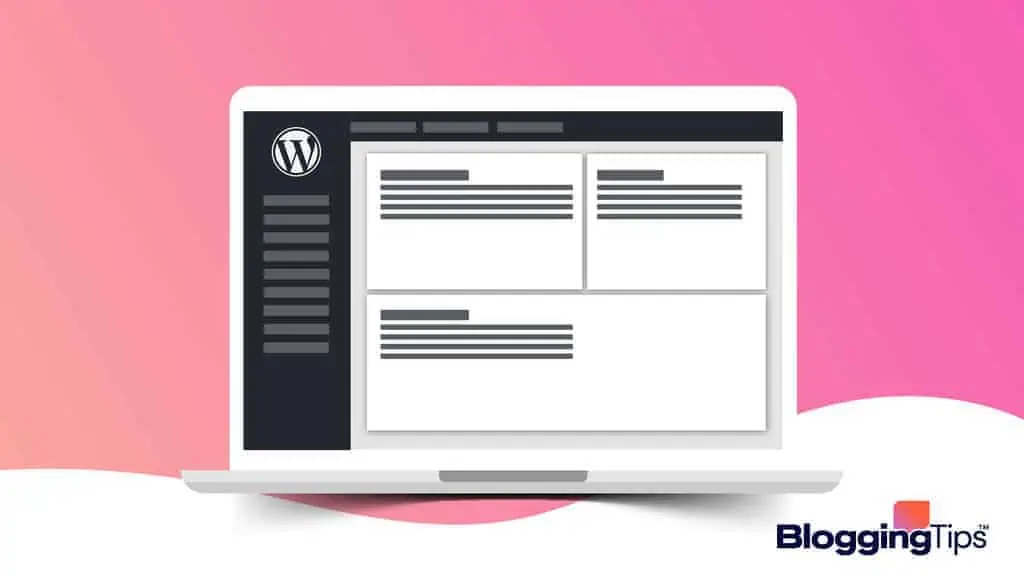
If you’re starting a blog, WordPress.org just makes sense. It was initially built specifically as a content management system, but over the years, has evolved into so much more.
This platform is built with content in mind, so you’ll find that it’s easy to learn (we have a course that teaches how to use WordPress). But it’s so much more.
You can build eCommerce stores, forums, and so much more on it. In fact, this entire community is built on top of WordPress!
What makes WordPress so great is that it is the world’s most widely-adopted content management system. Most of the world’s websites are built on top of this platform.
This means that there’s a HUGE network of themes, plugins, developers, and support specifically built for WordPress. I have never not been able to find a plugin or a developer to help me modify my site the way I wanted it.
3. Hosting
WP Engine is my go-to host for WordPress sites, and is what I recommend to beginners and experienced bloggers alike. It’s a fully-managed WordPress host, which means you’ll pay a little bit more every month to use the service, but trust me when I say it’s worth it.

First, it makes creating a WordPress site as easy as a click of a button. You can literally spin up a blank WordPress site by clicking a button and then naming the install.
Once it’s live, you can begin developing right away. When you’re ready to install the domain on the site, that’s also only a few clicks. Same with SSL, backups, restoring backups, and more. They even have a plugin that will automatically update all your plugins for you. This alone saves tons of time per week.
In addition, it’s backed by amazing support that will help with pretty much anything directly related to the site. I’ve accidentally taken my site down or made mistakes that I can’t fix, but support was happy to reverse the changes and get my site working again.
In fact, it is such a good host that I require it as a prerequisite before I take on a client through my agency, TrendlineSEO. I will migrate the client off their current host and onto WP Engine simply because of the features, efficiency, ease of use, and support that it offers.
In short, it’s a host that is VERY easy to use, but also packed with features that save SO much time. You do not get this with a cheap host. It’s definitely worth the small additional cost in the long run.
4. WordPress Theme & Framework
Another secret weapon in my arsenal is GeneratePress Premium. This is actually a WordPress framework that’s built with ease of use and performance in mind. And it shows. It’s incredibly fast, lightweight, and modular.
There are a ton of themes that are already pre-made and ready to import once you install it. These are very well-designed and look incredibly professional.
They’re also super easy to modify, which allows you to start with a good foundation, with the ability to customize pretty much everything to make it uniquely your own.
On top of that, there’s a HUGE amount of documentation tat your fingertips when something goes wrong. I don’t think I’ve ever run into an issue that I’ve had with GeneratePress that I wasn’t able to find a solution to after searching their support forum.
On top of that, the development team is incredibly responsive and helpful if you are a GeneratePress Premium subscriber and need help.
5. WordPress Plugins
I also use a few plugins in addition to the items above:
Site Kit by Google
Site Kit by Google is an easy way to monitor a blog’s performance and search engine presence. It integrates various Google services, including Analytics, Search Console, AdSense, and PageSpeed Insights, directly into the WordPress dashboard.
This means I can easily track visitor behavior, site traffic, and page performance without having to install conflicting third-party plugins or deal with placing code in my header. Once set up, it’s fairly hands-off.
Akismet
Blogs get a lot of spam. Like… a LOT. Once the bots find your blog – especially when it gets more popular – you’ll notice the same. That’s where Akismet comes in.
This plugin has been a lifesaver in helping prevent and manage spam comments on my blogs. It automatically checks all comments and filters out those that look like spam, then automatically deletes what it flags.
The plugin is actually incredibly efficient in distinguishing between spam and genuine comments, which saves me a ton of time and frustration of having to constantly delete hundreds of low-quality spam.
Gravity Forms
Gravity Forms is a powerful form creator that allows me to create and customize forms with ease, thanks to its drag-and-drop interface. It’s easy for beginners to use, but scalable for the future.
It appears simple at first, but once you start playing around with the settings, there’s a lot more than this plugin can do if you need it to. For example, I recently set up a fairly advanced series of multi-page forms that were powered with Gravity Forms’ conditional logic feature.
It also comes with spam-fighting features like hidden honeypots, Recaptcha integration, and more. Contact Form 7 (a very popular form plugin for beginners) is great, but this is way better.
Rank Math Pro
If you ever hear the plugin “Yoast”, turn the other way and choose Rank Math Pro instead. I used to use Yoast on my blogs, but it went through a series of changes that I didn’t like. Constant price increases and countless technical bugs led me to Rank Math Pro and I haven’t turned back since.
Rank Math is a very robust SEO tool that helps me optimize my content, manage keywords, track rankings, and much more. It also has a very powerful redirection feature that I use a lot during site audits and content pruning.
It’s super simple to set up, and even easier to use. If you’re looking for a great SEO plugin, definitely make sure to give this a try.
Imagify
Imagify has been crucial in maintaining my site’s performance and loading times, especially as visual content became a more significant part of my blogs. It automatically optimizes images upon upload, reducing their file size without compromising quality.
This has not only improved my site’s speed but also the user experience, particularly for readers accessing my blogs on mobile devices. The ability to bulk optimize images also saved me considerable time when I first installed the plugin.
WP Rocket
WP Rocket is, without a doubt, one of the best caching plugins I’ve used to speed up my WordPress sites. Its user-friendly interface allows for easy setup, and it offers a range of optimization features beyond caching, such as GZIP compression, database optimization, and lazy loading for images.
What sets WP Rocket apart is its ability to deliver noticeable improvements in site speed without requiring technical expertise, it an easy choice when trying to figure out how to improve a site’s performance and SEO.
A Word of Warning When First Starting Out
While starting your first blog, don’t get caught up in the buying frenzy. The marketing teams behind most of these tools and services are smart. Many of them directly target new bloggers.
I fell into their traps as a novice, but looking back, it pains me to see how much money I spent on tools, plugins, themes, and subscriptions that I didn’t actually need.
At some point you’re going to look at something and think that you “need” it. I can tell you from experience that you don’t. You’re going to likely spend money you didn’t need to spend and then later wonder why you did that.
Yes, that theme might make your site look really nice, but at what cost? Does it work with other plugins? Does it slow your site down?
How about that cool AI tool. Yes, it can produce thousands of words per minute, but again, at what cost? Does doing so break Google’s guidelines for AI content? Does it even produce high-quality content, or are you doing by using it?
Be VERY aware of this shiny-object syndrome and resist the urge to buy things you don’t need.
With that in mind, I’ll make it very clear which of my recommendations are necessary and which just nice to have. My goal for you is to get your blog off the ground in the most budget-friendly way possible.
Key Takeaway
When properly combined together, this tech stack gives you a nice-looking, professional website that loads quickly and is easy to maintain. It offers a high level of customization and scalability, essentially future-proofing your blog.